Introduction:
DIY Shelf Installation Tutorial! Putting up shelves at home is one of the easiest and most helpful DIY projects for beginners. Shelves may help you organise your home, save space and improve the overall look of any area. If you’re looking to add some storage space to your kitchen, bedroom, bathroom or living area, a simple shelf installation can do the trick.
This DIY shelf installation tutorial is a great project for beginners and budget friendly storage options. You don’t need to be a skilled woodworker to perform this project. Follow these simple steps to install durable and stylish shelves, securely and professionally.
Create stunning DIY shelves and upgrade your home storage with easy-to-follow beginner-friendly methods.
Table of Contents
What Tools Are Needed For DIY Shelf Installation – Collect Resources!
Gather all the equipment and materials you’ll need before you start your DIY shelf installation tutorial. The right instruments make the project safer, easier and more professional.
Tools Required for Installing a Shelf:
- Tape measure
- Drilling Machine
- Wall insert.
- Screws.
- Screw Driver
- Spirit level.
- Marking pencil
- Shelves of timber
- Shelving brackets
- Gloves, safety
These are common equipment used in novice DIY shelf projects. High quality tools help to keep shelves sturdy and stable for a long period.
Why Accurate Measurements Are Important – Get the Measurement Right!
The most critical part of shelf installation is accurate measurements. If the measurements are off, your shelf can end up crooked or wobbly. Before drilling any holes, use a tape measure and spirit level.
Measure the wall space for the size of the shelf. Leave plenty of space above and below the shelf for decorating and storage Also proper planning helps to improve the balance and look of the place.
How to Choose the Best Shelf Style – Select Style!
Different room, different shelf type. Choosing the proper design can help to improve both home decoration and storage.
Popular Types of DIY Shelves:
- Shelves (floating)
- Corner shelves
- Wall shelves wooden
- Metal support shelves
- Rough shelves
- Minimalist shelving
Floating shelves are trendy and contemporary. Small room corner shelves that save space. Wooden shelves with warm and natural look
Select a design that will complement your room’s decor and storage demands. For small areas, light coloured shelving is good as they make rooms feel bigger and brighter.
How to prepare the wall for installation – Wall Prep!
Before fixing shelves, you need to prepare the wall appropriately. Good wall preparation means stable shelves and no harm in the future.
First, scrub the wall surface of dust and debris. If you can, identify wall studs, because shelves anchored to studs are more secure and stronger. Carefully mark the drilling points with a pencil and spirit level.
Different wall materials require different anchors. For plasterboard, you normally need wall anchors, for concrete walls you need masonry screws. Choose heavy-duty mounting hardware depending on the wall type.
How to Properly Install Shelves – Make the Move!
Step-by-step installation of shelves allows newcomers to avoid confusion and do the job safely.
Step 1: Positioning Mark
Mark shelf location carefully with a pencil and measuring tape. Make sure the height of the shelf fits the layout of your area and your storage demands.
Step 2: Employ the Level Tool
Then check with a spirit level to make sure you’ve put it in straight. Uneven shelves might look untidy and risky.
Step 3 Drill Holes
Drill slowly on the marks. Use the suitable drill bit for the type of wall you are working on.
Step 4: Put in Anchors
Insert wall anchors into the holes you drilled. Anchors hold more weight and provide a better grip for shelves.
Step 5: Install Brackets
Screw shelf brackets tightly into place with a screwdriver. Make sure that you screw everything tight before you put the shelf board.
Follow these procedures attentively and you’ll be able to make robust and elegant DIY shelves for your home.
What are the best rooms for DIY shelves – Room Upgrade!
DIY shelves can enhance virtually every space in your house. They offer storage and bring beauty and organization.
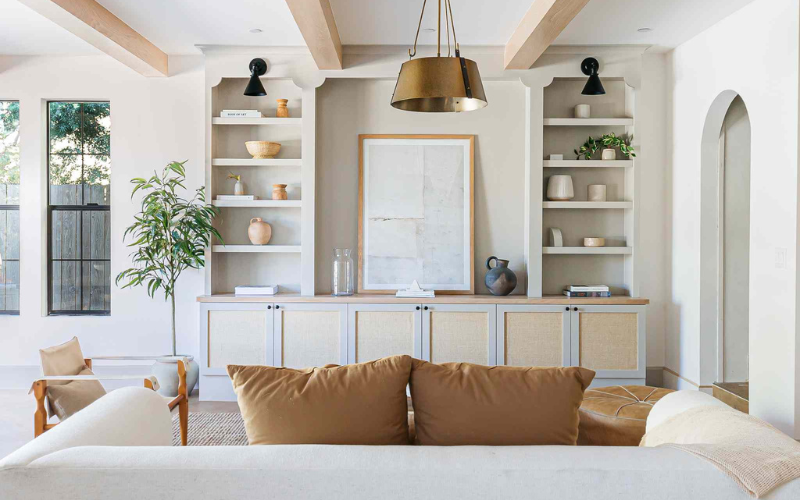
Living Room Bookshelves:
Shelves in the living room are ideal for books, plants, picture frames and decorations. Floating shelves give a contemporary, clean look.
Kitchen Racks:
Useful for storing spices, dishes and kitchen accessories are kitchen shelves. Open shelving can help provide the illusion of a larger, more organised kitchen.
Shelves in the Bathroom:
Shelves in the bathroom hold towels, skincare goods and toiletries. Waterproof materials perform well in humid conditions.
Bedroom Wall Shelves:
Useful shelves in the bedroom for books, decorations and personal accessories. Small wall shelves conserve floor space in small bedrooms.
Office Shelf:
Office shelves organise files, stationery and office supplies. More productivity and less clutter means organised spaces.
How Floating Shelves Liven Up Home Decor – Modern Décor!
Floating shelves are one of today’s most popular home improvement fads. The brackets are concealed for a clean, minimalist look.
These shelves are a great addition to modern homes, flats and compact areas. Floating shelves are great for displaying decorative goods, indoor plants, books, candles and artwork.
The other advantage of floating shelves is versatility. You may fit them in kitchens, baths, hallways or bedrooms. The simplistic design fits practically any style of home.
Floating shelves are also a hit with homeowners since they are inexpensive and easy to customise. You can paint or stain them to match your room colours and furniture theme.
What are the Common Mistakes to Avoid for Beginners – Don’t Be Stupid!
Many beginners make simple blunders while installing shelves that can affect both safety and the way they look.
Wall Bypassing Type B:
Walls of different kinds need different anchors and screws. If you don’t have the right hardware, you won’t have the shelves properly supported and you run the risk of damaging a wall over time.
Unequal Measurements:
Wrong measurements result in crooked and amateur-looking shelves. Always double verify markings before drilling.
Shelves in Overabundance:
Shelves can be damaged by heavy things if weight limits are exceeded. For heavier storage needs, use heavier brackets.
Screws loose:
Cheap screws might come loose. Robust hardware improves shelf life and safety.
Bypassing Level Checks:
Always install using a spirit level. Flat shelves enhance both the look and utility of a home.
Read More:
10 Mistakes That Make Your Home Look Cheap!
How To Decorate Installed Shelves In Creative Ways – Style Your Shelves!
After installing, suitable decoration of shelves is a good way to boost the beauty of your home.
Add Plants Indoor Plants:
Freshness and natural beauty from little indoor plants Plants additionally enhance room mood and trendy décor trends.
Ornamental Baskets:
Storage baskets are perfect for organising tiny goods while still keeping a clean and elegant look.
Display Picture Frames:
Family photos and artwork on the bookcases give the living space a personal, warm feel.
Organise Books Neatly:
Books make bookcases look characterful and stylish. Shelf organization gives a professional look to the decor.
Add soft lighting:
Shelf lighting with LED strips may create a pleasant environment in a space and make ornamental things stand out.
Why DIY Shelves Are Better Than Store Bought Storage – Create Better!
DIY shelving is inexpensive, flexible and imaginative. Homemade shelves are not pricey store furniture and may be created precisely to the measurements and style of your room.
DIY projects also give homeowners the option to choose materials, colours and patterns. This is one of a kind home decor and saves you money. The ready manufactured storage cabinets are pricey and do not fit into compact places.
Another benefit is learning practical skills. Putting up a shelf teaches a novice important home improvement skills that can be applied to subsequent do-it-yourself tasks.
How Installing Shelves Increases the Value of a House – Increase Value!
Shelves well installed increase the look and house management. Smart storage solutions are a homebuyer’s dream. Why? Because organised spaces feel bigger and cleaner.
Modern floating shelves Create Stylish Interior Decoration Enhancing Property Appeal Adding storage to kitchens, bathrooms and living areas may dramatically boost the appeal of a home.
DIY shelves are very economical compared to major improvements. Often the biggest visual impact comes from small modifications without spending too much money.
Good shelf installation shows a homeowner keeps up on upkeep and thinks about design. This could even increase property value.
FAQs:
How much weight can a DIY shelf hold?
Most DIY shelves can carry light to medium weight depending on the type of brackets, screws and wall type. Use strong anchors for secure support.
Are floating shelves good for beginners?
Floating shelves are beginner-friendly, yes, providing you use proper dimensions and tools with care when installing.
Which wood is good for DIY shelves?
Pine wood, plywood and oak are popular shelf materials because they are robust, inexpensive and easy to work with.
Will shelves damage walls?
Properly installed right anchors minimise damage to the wall. Wherever possible, avoid drilling holes in weak regions.
How Long Does It Take To Install Shelves?
A simple DIY shelf installation normally takes anywhere from one to three hours, depending on the size of the shelf, the type of wall, and the amount of experience.
Conclusion:
This DIY shelf installation lesson demonstrates that even novices can successfully mount elegant and practical shelves at home with a few basic tools and some forethought. Shelves are a cost-effective and practical solution for storage, organising and home design.
With step-by-step instructions, the right shelf design, and avoiding common mistakes, homeowners can build sturdy and elegant shelves for any room. If you want floating shelves in the living room or storage shelves in the kitchen, this DIY project is a great way to update your home on a budget.